Tuesday, November 17, 2015

DIY Smash Cake Setup

I thought I would share some tips on my Son's 1st Birthday smash cake photo shoot, since the good ole' internets is exactly where I went when researching ideas for this. We did the shoot at home, so the first order of business was to find a "blank canvas" with lots of space. I would say ideally you want to be on the floor so you don't have to worry about your little one falling. Luckily, we have a lot of neutral walls so that was pretty easy. Even though we used photography lights, having natural light is a plus.

Next you have to decide what kind of background you want: banners, bunting, balloons, etc.... If you don't like the color of your wall, don't get discouraged. You can easily change it by hanging up a large sheet of paper, fabric, or even use removable wallpaper (which is what I used for my faux floor, but I'll get to that in a minute). I wanted bunting so I made my own from the large amount of scrapbook paper I have and some string. Just remember when deciding on your background, you don't want it too busy so that it distracts from the subject = your beautiful baby!

The floor in the area I choose was carpet, which, #1 was not the look I wanted and #2 I of course did not want ruined. I created a faux wood floor section by covering the wood insert of our Thomas the Train table with removable wood grain wallpaper. The insert has 2 sides/scenes, so no worry of wrecking it completely should the wallpaper NOT come off like it said it would. The wallpaper DID come off like it said it would. However if you plan to play around with more photo shoots, having a prop like this will come in handy. You could even invest in making a better one with real wood or scout out some super sale flooring at your local home store. We put a sheet under it to further protect the carpet, in case the birthday boy wanted to take off during the event. 

One of my dear friends - Casey - gave me this light setup quite some time ago to use for blogging. I am ashamed to say that this was the first time I got it out to see what it was all about. So awesome! My super duper friend Kristen took the pictures! If you remember anything about my previous posts, you know that Kristen and I are on the same page when it comes to details and the final result. So, I could not have done this without my friends help!
Other tips to consider...... If you want to use a cake pedestal, make sure it is one that you won't worry about breaking should the baby tip it over. I used a wood one. Try to stick to a simple color scheme - my main colors were blue and green. The theme of Carson's party was dinosaurs, so I made all of them paper hats! I even found dinosaur diapers - from the same company that made the peacock diapers!
I spent very little on this DIY, as most of the things I already had on hand. The things I bought were the diapers (which he needs anyway), removable wallpaper, Happy Birthday cake decoration, and of course the ingredients to make the cake itself. I LOVE how this all turned out! It was exactly what I had pictured! This is just a small sampling of the pictures!


Tuesday, November 10, 2015

Rain Coat

I haven't had a rain coat since....... I was a kid! In my efforts to add olive colored outerwear to my closet (see jacket and vest here) I came across this floral number at a local boutique. The Potting Shed in Chelsea is one of my fav stores when it comes to eye candy. They actually have 3 locations downtown - one is all home decor / garden / kids stuff and the other two are women's clothing and accessories. The prices are a bit high though, so when I saw this jacket there was no way I was going to be buying it. Plus, they didn't have my size. 

So I did what I always do: looked it up online when I got home. The retail price they were charging truly was the same as direct from the brand at $230! Luckily though, I was able to find a great sale and score it for under $100! I reasoned with myself that having a rain coat would be a helpful addition to my life. The brand - Joules - seems to carry this style of coat all the time, they just update the prints for the seasons. Definitely do what I did and wait for a sale when it's time for them to clear out last seasons colors. 

I will say it is soooooo well made and attention to detail is wonderful. It truly could last me a lifetime. Olive green and pink is one of my favorite combos, and the flowers are peonies which are also one of my favorites. I put together what seems to be a "classic" print mixing now: stripes and floral. 

It's already seen a number of rainy days, the most helpful being Halloween! I knew I forgot something when talking about my "lists" yesterday. Halloween was in the mix there - my favorite holiday - and I had to make sure the boys had costumes ready (I made part of Richard's). I volunteered at Richard's school party which consisted of bringing the beverage and making treats to hand out. Carson's celebration happen to be his last day at the daycare he was at, so I had to remember some special treats from a new local candy shop for the staff and a gift card for his teacher. Whew! Anyway, trick or treating had some rainy moments but we still had a blast! I was 100% comfy and dry in this number!


AB Studio Dress - Kohl's
(seen here, one of my FAV days in Chicago - and also here)

Silver Dollar Boots - Aersoles


Linking up with The Pleated Poppy

Monday, November 9, 2015

First Things First

Life has been super busy lately, and when I get overwhelmed I just try to focus on one thing at a time. Ground breaking, I know. Seriously though, checking things off my list makes me feel a little more at peace and ready to move on to the next thing. I may get really excited to work on something that is weeks away instead of taking care of something that is happening tomorrow. So I need to practice that self discipline.

Even though I have spent months preparing for The Antique Mercantile booth, I physically spent time AT the booth the last 3 weekends. Even though it is up and running, it will be a continuous job for the next 6 months as we will always be adding merchandise.

I was reading an article the other day about juggling everything and how you just cannot do it all and there will always be something that is being neglected. And you just have to be okay with that concept. That can be hard for a Type A, Virgo like me. One of the things that had fallen to the wayside during this time is a clean house. Thank goodness Jon has been understanding that we both have been busy and we both had a major cleaning session over the weekend. So that was next on the list along with taking down the Halloween decorations.

The boys had picture day at school today, so getting their outfits together got checked off. Parent/teacher conference for Richard tomorrow, and Carson's first birthday this weekend. Then it will be full blown holiday season and all that comes with that. The weather certainly has changed a bit from my last post, making it feel more like Fall but still pretty darn pleasant. It was nice to wear a more Autumn-like outfit!

Vest - similar here, originally seen here
Zuma Necklace - Anthropologie
Levi's High Rise Jeggings - Macy's


Friday, November 6, 2015

Fall Flutters

Hard to believe I am wearing short sleeves and sandals on November 4th in Michigan! I'm not complaining though! At least these colors I am wearing are "Fall-ish". I've probably mentioned this before, but I am constantly editing my closet. Not only what is in it, but I am always looking for new and better ways of organization so that I can pull outfits together with ease. I've been like this since around high school, when family members would joke with me and say "let me know when you are going to get rid of that because I want it".

As an adult, I have 3 methods when it comes to closet purging: eBay, consignment, or donate. I use eBay when I feel the selling price is going to be worth my while to take pictures, list, go to the post office, etc..... Consignment for things that are still really nice but don't make the eBay cut. And donate when I feel the item wouldn't make the consignment cut. I should probably mention that the consignment shops I have worked with have always donated any unsold clothes after the season is over and as a client I like that. In turn, the money in my Paypal account, and balance from selling at my local consignment shop, I use buy other pieces I am interested in so really it is a way to support my love of clothes.

Lately though, I have come across some crazies (and I mean CRAZIES) on eBay, along with people who just decide not to pay for their purchases, etc..... This is making me rethink selling on there in an effort to simplify my life. I've kicked around the idea of trying other sites like ThredUp and Poshmark. Anyone have good or bad experiences on those sites?

Anyway, as much as I cycle through my wardrobe, there are always those special pieces that I hang onto no matter how long ago it's been since I've worn them. That is the case with this cute butterfly jacket. It's been a few years, but I love it with this dress. One last flight before the weather turns for good!

Elevenses Jacket - Anthropologie via eBay, also seen here
Falls Creek Maxi Dress - Meijer ($7)
Amber Necklace - gift from hubby
Jessica Simpson sunglasses - TJ Maxx
Sandals - Payless


Wednesday, November 4, 2015

Cold Ankles

So I'm back to talking about my peep toe booties...... obviously trying to wear them as much as possible before the snow flies! These pictures aren't that great, but I love the simplicity of this outfit from last Friday. I have to admit, when open toe boots started coming out a few years ago I was a bit baffled. I mean, what is the point of a boot if part of your foot is exposed!?!?! But, as with a lot of things, they started to grow on me. I'm also trying to get used to having a bit of ankle exposed when wearing booties with pants. I've been stumped in this area for a bit. I always felt like I got it right when I wore them with skirts / dresses (meaning proportions, lengths, etc. - no one wants their legs to look stumpy) but pants? That was a different story. It seems the trend of showing ankle has grown on me now too, and once again how does this make sense? Your ankles are going to get cold!

There are a few ways to achieve the right length pant for your booties. You will notice many retailers offer "ankle" length pants. NOT crop pants, but more of a pixie pant, making the leg look flattering with all kinds of footwear (flats, heels, booties). Or, you could purchase the "short" length of the pants you like provided they come in short, regular and long. That is what these jeans are. My favorite pair of high rise in the perfect color and I didn't purposely seek out the short version - it was just all they had left on the clearance rack at American Eagle. I am telling you though, the length works with everything! Sandals, moccasins and now my booties. And later in the season when I tuck them into my taller boots, the length won't matter. These truly are a "wear with everything" jean.

Lastly, if you don't want to own several lengths of pants, you can roll your jeans like I did in my previous post about these boots. Who would have thought rolling your pants would come back? Thank goodness it is not the same as how we rolled pants in high school! I seem to remember using a safety pin to "peg" them BEFORE rolling them. We would also tuck the "pegged" hem into our bunchy socks. I remember having this clip on straps as well to turn any pair of pants into stirrups so they would not untuck from said bunchy socks. 

These ankle length jeans? We would have called them "high waters"!
The flare leg trend? We would have called those "bells" and not been caught dead in them!
Funny how things change!

High Rise Jeggings - American Eagle

Fergalicious "Cleo" Booties - DSW

Apt 9 Spider Pin - Kohl's

Black Tunic - Meijer
Seen here, and tucked in here


Sunday, November 1, 2015

Grand Opening

I have no idea how I am even functioning right now! It has been a whirlwind weekend for sure! No, it's not that extra hour. In fact, that is probably going to make me crash and burn even harder. We worked at the booth both days (today was the grand opening of the second floor where our space is)....... had tons of Halloween fun with the kids and friends...... along with the usual grocery shopping, laundry, cooking, cleaning, etc... Anyway, I am excited to get this post up to show some of our wares at the booth thus far! As I was there doing some last minute pricing today for a couple of hours, we already sold 4 items in that short time. That just makes me more motivated to create and curate more goodies to offer!

First up, I am going to show the handmade items I've been working on. I've basically replicated every project I've done for my own home decor because I have loved everything so much. I am linking back to the original posts for each project as well. Any questions, let me know.

Collector Trays - $12 each
(Love Your Life SOLD)
I'll be making up a couple more of these.....
 Painted Globes
Feathers - $50
Moon/Stars - $20
I love doing these and want to do a bunch more!
 Embroidery Hoop Picture Holders
$15 - $20
 And a few decorative hoops you can mix into a wall collage
$5 - $10
 Wood Burned Spoons
$5

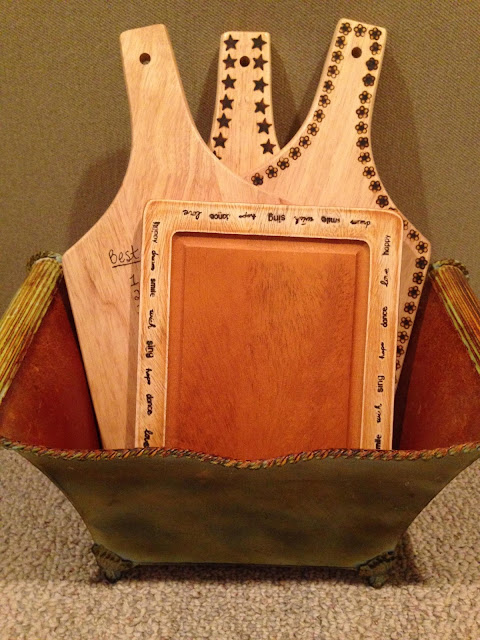
 Wood Burned Cutting Boards
$10

I also have a tray of about 10 of my handmade necklaces there but forgot to get a close up picture of it. I also have a couple of these snow globes there and intend to make some more too ($4 each).

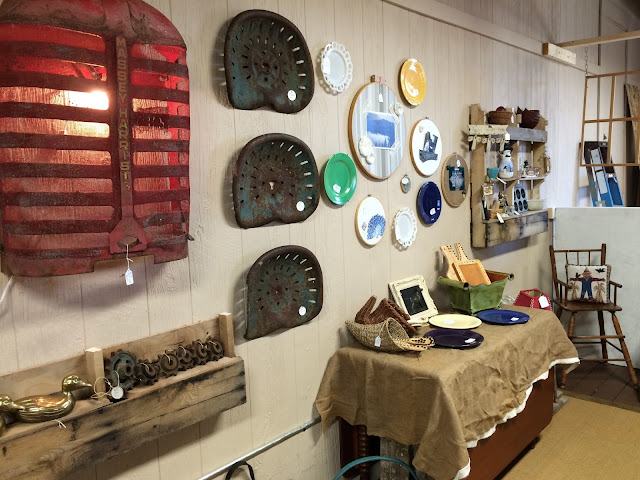
Besides handmade, we've done our share of "picking" and purging of our own things to sell. When we were in Wisconsin this summer, Jon, Dad and I went out rummaging. We stopped at a house that had a bunch of farm equipment towards the road. We made some deals on some of it, and as we talked to the guy he invited us back further onto his property where he had more stuff. I felt like we were Mike and Frank on American Pickers! Just by talking to someone about a common interest, and all of a sudden you have access to all of this cool stuff! Rusty gold as Mike would say! 
No replica made in China can duplicate this patina!
 Here is our booth, ready to be filled. We spent last weekend painting the raw walls white (because that is what we had and since this is our first time doing this, we want to keep costs to a minimum).
 And here is what it looked like when I left today. It's a great start with what we have so far. Our booth is the first one you see when you come up the stairs. We are committed for 6 months, so during that time we will be filling it up and moving stuff around a lot I am sure. Once that time is up, we will get a better feel if we want to continue.

 Kristen has a lot of vintage kitchen goodies, including Fiesta Ware, Pyrex and Milk Glass.

 Kristen's handmade flower pins - $5
 Jon and I spent a week before we were married, redoing this Hoosier Cabinet. Sadly, the only place we used it was in our first apartment. Since it's been sitting for almost 13 years, we decided to try to sell it. It was a chippy white before and we stripped it all down and used a paint gun to get a really smooth finish with the 2 shades of green. I decoupaged and hand painting the fruit decor. There are even little fruit details on the insides of the doors. We also replaced all of the hand ware.
 Tractor Grill Light - $125
 Jon whipped up some quick pallet shelves for us yesterday morning.
We have a lot of Christmas themed treasures already! I've purged my McCoy pottery, some stained glass pieces....... It's a work in progress. It seems like this is the first time for many of the other booth owners, so it's nice to have that camaraderie and compare notes. I am excited and feel like I have so much more to say, but I am fading fast...... If you are interesting in seeing our stuff, along with tons of other cool stuff, here's the info:

The Antique Mercantile
409 Hupp Avenue
Jackson, MI
Tuesday - Saturday: 10-6
Sunday: 12-5