 To bring out the minty green in the heart of another one of Jade Scott's infamous pendants, I strung a delicate chain of prehnite chips and ovals, and green pearls.

Wednesday, April 21, 2010
Love Letter No. 65
To bring out the minty green in the heart of another one of Jade Scott's infamous pendants, I strung a delicate chain of prehnite chips and ovals, and green pearls.
Monday, April 19, 2010
Hometown Inspiration
The first 24 years of my life were spent in Racine, WI - right on Lake Michigan. When I was little, my Dad owned a sailboat - Oasis was it's name. He participated in races and on the weekends we would often go out on the lake for leisure. To be honest, I didn't really like it. When the lake was calm, it was okay. But if anyone has had experience on a big lake, you know it can get really rough. I didn't have sea sickness or anything, I was just scared of the huge waves and how the boat seemed like it was going to tip over. I can remember when one side of the boat would be in the water if the wind was strong - that's how far it would lean over!
 Now that I have not lived directly on Lake Michigan for 8 years, I do miss it. I miss the huge beach, and sitting out on all of the restaurant patios. Maybe I would like boating on it now that I am older. But for now, I enjoy boating and water sports on small inland lakes in Michigan.
I hope you enjoyed this trip to the lake with me! Sure gets you in the mood for summer! Happy boating!
 Now that I have not lived directly on Lake Michigan for 8 years, I do miss it. I miss the huge beach, and sitting out on all of the restaurant patios. Maybe I would like boating on it now that I am older. But for now, I enjoy boating and water sports on small inland lakes in Michigan.
 Here is a photo of the Wind Point Lighthouse, at the north side of my hometown.
 And here is a picture of the marina at the south side of town. When I was a teenager, a bunch of us would climb up that red lighthouse and sit and talk for hours. Movies and bowling only occupied us for so long I guess.
 So, when Jade Scott came out with her sailboat pendants, they really spoke to me. I was able to snag a few earlier this year, and I just let them sit on my work table so that I could really think about their designs. I started pulling components I had and added them to the pile of sailboats, and then collected a few items when I would spot something out shopping. When getting inspired for these necklaces, I was thinking about water, rope and sailors knots, shells, anchors, compasses, beach glass......... Before I knew it, the designs just came together effortlessly. I immediately knew what was going to go with each boat.


 Closer detail.......

 And here is a picture of the marina at the south side of town. When I was a teenager, a bunch of us would climb up that red lighthouse and sit and talk for hours. Movies and bowling only occupied us for so long I guess.
 So, when Jade Scott came out with her sailboat pendants, they really spoke to me. I was able to snag a few earlier this year, and I just let them sit on my work table so that I could really think about their designs. I started pulling components I had and added them to the pile of sailboats, and then collected a few items when I would spot something out shopping. When getting inspired for these necklaces, I was thinking about water, rope and sailors knots, shells, anchors, compasses, beach glass......... Before I knew it, the designs just came together effortlessly. I immediately knew what was going to go with each boat.
DREAM BOAT: This long necklace that slips over the head features a ceramic "dream" bead from Diane Hawkey in the most perfect turquoise blue. I mixed together components from 2 different necklaces - one from American Eagle and the other from The Limited - starfish, a disk shell, and a length of rope to name a few. I very rarely work with yellow, so I love how it makes this piece "pop"!
STILL WATERS: I had this "still waters run deep" pendant from Heather Wynn, and in order to make it into more of a connector, I poked some silver wire into the bottom of the soft polymer clay. From it, I hung the boat and then had these shimmery glass beads in the perfect palette. They remind me of beach glass.
SHE SELLS SEASHELLS: This boat features my most favorite color combo - pink and green! I found the most perfect mix of faceted stones at Michael's - I am thinking they are jade - that had the same fuchsia pink, olive green, creamy yellow, rusty brown, and black colors. They are strung with thin brass rings in between them. Up the other side of the necklace is brass shells, wired together with smaller round versions of the same stones.
NOT FOR THE FAINT OF HEART: This last design is truly for the fashionista who loves to sport big, bold jewelry. From left to right, here are the components: Vintaj seahorse, Jade Scott boat in a ring I wrapped with twine, fossilized ammonite from Tika, anchor from American Eagle, shell slice, compass from Hobby Lobby, silver starfish. The chain of charms is held together with additional braided twine around the back. The twine was very nautical to me.
Closer detail.......I hope you enjoyed this trip to the lake with me! Sure gets you in the mood for summer! Happy boating!
Friday, April 16, 2010
PMC Class
So besides taking a stained glass class this Winter, I also took a Precious Metal Clay (PMC) class at the Art Center. PMC is a medium I have been wanting to try for quite some time. It was very interesting and informative. We first worked with silver PMC3, which is the formula that does not require a kiln to fire it. It can be fired with a butane torch. I was happy about this because I have a butane torch, so if I ever wanted to try my hand at it again I would only need to find a tumbler if I wanted to achieve that super shiny finish. Below is the quarter size pendant I ended up with. It is hard to take photos of something that is so shiny and still get the detail. Even though our teacher had a brand new package of clay from a reputable supplier, this particular batch was a bit dry. It is tricky to work with and you can only "work" it or rehydrate it so many times before it is too late. This bird impression was from a rubber stamp. Although cute, it was not the first impression I choose but because the clay was getting so hard the original stamp I picked was not working. You can also see teeny tiny hairline markings on the surface - this was form the clay getting too dry. They are so small that you might not be able to see them (to correct them) before the piece is fired.
It was really cool to be able to fire it yourself and see the transformation. After it was fired, you had to take a wire brush to it to remove any residue, then burnish it, then pop it in the tumbler. I know you can also apply patinas to it, so I'll have to experiment with that.
 For our next project, we were going to work with bronze clay. I felt that this was a bit easier to work with then the silver clay, however it does need a kiln to be fired. We were going to make a hollow bead by creating the 4 sides and then putting them together. I choose to do the pillow shape, one of the two shapes our teacher demonstrated. For my texture, I brought in this plastic peacock I got at the zoo. Ohhh, it looked so cool! But, unfortunately, something went awry in the kiln and all of our pieces did not turn out. Bummer!
 Since our teacher had taken the hollow beads home to fire in her kiln, she felt just terrible that they didn't turn out. So she make us all similar pendants out of the bronze clay. She had a peacock feather stamp that she used for me.
 Our last project was to make a mold for the bronze clay. We used a 2 part mold material, that you quickly mixed together with your hands and then pressed your object into. I did a little twig. It is not been fired yet, so this is what the bronze clay looks like once it has dried.
 So, I know I didn't go into a lot of detail with the process, steps to make a piece, etc... I just basically wanted to share a summary. But I did learn a lot in the class and am glad that I finally got to try working with PMC.
Wednesday, April 14, 2010
More Wood Beads in Action
 What a nice surprise this morning, to see this cool bracelet made by Lorelei with one of my wood burned star beads! I think this turned out awesome! I love the colors, the owl, and I love seeing where my wood burned beads end up! Check out her Etsy shop here.
Sunday, April 11, 2010
Displays and Branding
UPDATE: solution for the earring cards..... I found some old stickers as well when I was cleaning. Read more below...
 So I'm going to start cleaning out my Etsy store in order to bring new items to a store I sell at locally on Wednesday. Last Fall, there was a gift shop that was going out of business at my Mom's work and she inquired about their displays. They were going to give them away! So she was able to nab this nice one for me. It has 3 arms that come out from the center, each with several rungs that hold earrings, necklaces or bracelets. It is a nice blonde wood and swivels around. However, it's sides and base was marked up with the brand of jewelry that it carried in it's former life. So, to make it my own I adhered a patterned feather paper down the 3 long "ends".......
 ....... and some of my old business cards on the base. Now that I see those earring cards in the picture, I think they could use some peacock adornment too. Anyway, I hope the shop owner likes it and will want to use it in her store. She has several other jewelry displays, so I think it will be nice for customers to know that all of my work is located in this one area. When she puts outfits on the mannequins, she also works my jewelry into the looks which is nice. So, it's just another way to continue improving my brand.
 As I clear out the store, I'll try to add some new things - like this wrap bracelet or necklace piece. Done in blues and pinks, it features a polymer bead by Andrew Thornton, a ceramic "bliss" bead by Diane Hawkey, and a lampwork glass bead my SueBeads.
  Enjoy the rest of Sunday, for tomorrow it is back to the grind!
Saturday, April 10, 2010
H to the izzo......
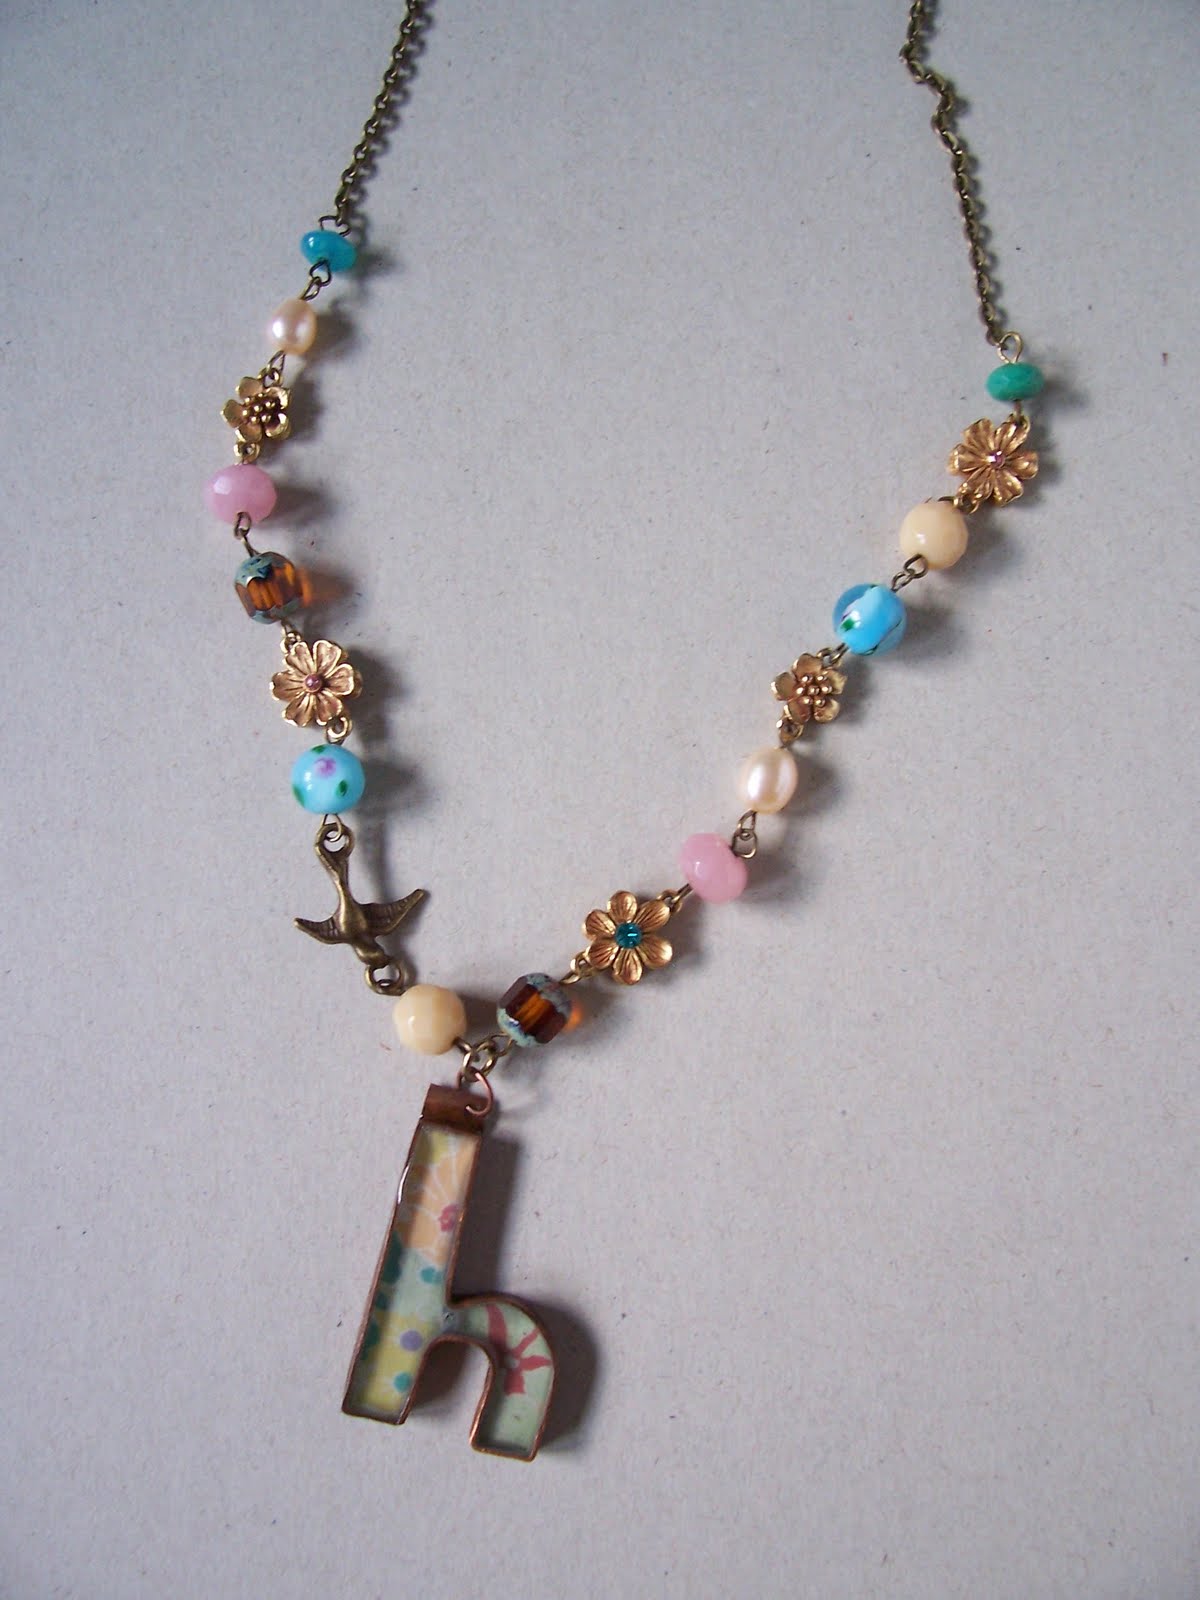 I love, love, love this newest creation! It evolved and transformed out of a store bought necklace which was revamped for the second time. I'll get to that later. Anyway, it features a lovely copper and resin filled "h" from the wonderful Jade Scott. I linked together all of the beads and components from the said store bought necklace, and added in a brass bird. It turned out very vintage, feminine, and delicate. I really like seeing all of these elements right-next-to-each-other instead of spaced apart as they were before. Oh, and if you are wondering about the title, that is a nickname from some of my close friends at work!
So here is what the original necklace looked like - sort of. Imagine it without the souvenir pennies in it. It was a long necklace that I bought at The Limited many years ago. I would wear it from time to time - sometimes long, sometimes doubled up - but I often go through my jewelry box and take things out that seem old and tired to try to spruce them up. When I had the idea to incorporate my pennies into a piece of jewelry, I thought this was a simple solution. It looks nice enough, but not enough to keep my interest for long. I wore it a few times but it just didn't wow me. So then I realized that all of the soft colored beads, pearls, and floral links looked great with my new initial pendant.
 But now, what to do with the pennies? I guess this was revisited because I just scored 2 new pennies during my recent trip to Chicago. Here is what I came up with. I linked them together much closer this time, each separated with a copper round. I picked up this cute coin purse pendant at Hobby Lobby - it even opens up for secret treasure. How perfect since you keep pennies in your coin purse!?!?!?! I like it, and I know that my original store bought necklace has gone through it's last makeover.
 I'm going to enter the initial necklace into Erin's "Before and After" challenge. Read about it here!
 Friday, April 9, 2010
Postcard Salon - Update
So, remember last week when I posted the cards I made for the postcard salon at the Art Center? Well, the event was last night. Here are some pics of Gallery 1 at the Art Center, with the walls filled with postcards! There were so many mediums the artists created their 4 x 6 works from: watercolor, oil painting, photography, drawing, mixed media collage, fibers, stained glass.... and of course mine were created from copper, wood, and beads. $20 for each of these mini works of art is so reasonable!

 So at 5:55, members of the Art Center got first pick. There was one card in particular that I was coveting. And of course, several other people were coveting it as well. Jennie, the Office Manager there, creates the most unique art dolls - all pumpkin/Halloween themed. She sculpts their pumpkin heads out of clay, paints them, and sews all their clothes. Quite often, she embellishes them with glass charms made by one of our glass blowing teachers, Joe Takens. Her dolls sell quickly, and I am sure they are soon going to be showing up in some magazines. I have been wanting one for quite some time - after all, Halloween IS my favorite holiday! Visit Jennie's blog here to see more of her work.
I met a new person, John, who purchased my copper postcard. As far as seeing if my other two sold, I do not know amid the chaos. After I made my purchases, I was anxious to get home after some long nights at work on Tuesday and Wednesday. The remaining postcards will be up for sale for a bit longer, so you still have time if you are in the Battle Creek area!

 So at 5:55, members of the Art Center got first pick. There was one card in particular that I was coveting. And of course, several other people were coveting it as well. Jennie, the Office Manager there, creates the most unique art dolls - all pumpkin/Halloween themed. She sculpts their pumpkin heads out of clay, paints them, and sews all their clothes. Quite often, she embellishes them with glass charms made by one of our glass blowing teachers, Joe Takens. Her dolls sell quickly, and I am sure they are soon going to be showing up in some magazines. I have been wanting one for quite some time - after all, Halloween IS my favorite holiday! Visit Jennie's blog here to see more of her work.
Anyway, here is the little "baby" I got! Isn't she cute! Attached to a simple brown paper bag to make her into a postcard. As the time approached 5:55, my heart was beating fast. We were all waiting in Gallery 2 for our Director to give us the go ahead. We were armed with tiny post-it notes with our names on them to stick on the cards we wanted. As soon as I heard the word, I ran.... and ended up winning this little beauty. I was really happy and excited, but still felt a twinge of guilt. I don't like cut throat type things...... I like being a nice person. I tried to compare it to winning an auction on eBay, or buying Jade Scott pendants on her update days. But still, I don't know why I fret about these things.....
 I also purchased 2 other gorgeous cards. Last year, when I purchased 4 cards, I shared one with my Mom. So this year she asked for another one. She has the choice between these two.
 I also purchased 2 other gorgeous cards. Last year, when I purchased 4 cards, I shared one with my Mom. So this year she asked for another one. She has the choice between these two.
This one is called Red and Orange Bouquet by Gretchen Foster. It is lovely layers of painted handmade papers.


I met a new person, John, who purchased my copper postcard. As far as seeing if my other two sold, I do not know amid the chaos. After I made my purchases, I was anxious to get home after some long nights at work on Tuesday and Wednesday. The remaining postcards will be up for sale for a bit longer, so you still have time if you are in the Battle Creek area!
Sunday, April 4, 2010
A New Peacock Pendant
This peacock pendant is from the new Orient Express line by Blue Moon Beads at Michaels. The color palette was very nontraditional for me when it comes to peacocks - more dark and earthy. To pull from the colors in the pendant I used grey and brown glass beads. To separate these 2 color blocks, I found some black enamelled filigree beads to coordinate with the black enamel frame around the image. Paired with just a pop of teal green.
I hope everyone had a wonderful Easter! Back to the grind tomorrow....


I hope everyone had a wonderful Easter! Back to the grind tomorrow....


Saturday, April 3, 2010
SALE! and new bracelets
I'm having a Spring cleaning SALE in my Etsy shop. I am gearing up to bring new items to the 2 stores I sell at locally, so before I take things out of Etsy I thought I would offer up a little deal on them: $5 off and free shipping! I will send out revised invoices.
Take advantage of the SALE on this new pretty I just added to the shop. Chunky opals with a charm cluster of an enamelled disk & dragonfly, filigree, and peal. The cluster actually used to be an earring from a mix of jewelry the lovely Erin at Every Heart Crafts sent to me to upcycle!
 This next bracelet features one of Humblebeads new sly little foxes. And a matching disk bead she sent along. I have yet to research what these stones are that I used. I bought them at the gem show that I went to in Detroit in November of 2008. The colors couldn't be more perfect for this little guy, but that's the only downside of purchasing strands from a huge mixed heap on a table. Sometimes you can't identify each and every strand. I wrestled for a while with a clasp for this one. First I was trying a toggle, but those can be hard with such large beads. Then I tried a button, with a beaded loop on the other end. Still didn't feel right. So I settled on a standard lobster clasp. For now anyway.....
Subscribe to:
Posts (Atom)